Diecast Repair Guide [7 Top] Tips
Diecast models, with their intricate details and historical significance, are treasured by collectors and hobbyists worldwide. These miniature replicas, often made of metal, can unfortunately suffer damage over time. Whether it’s a chipped paint job, missing parts, or broken wheels, restoring a diecast model can be a rewarding experience. This guide offers seven key tips to help you navigate the world of diecast repair and bring your beloved models back to their former glory. It provides a comprehensive overview of the processes involved, from assessing damage to applying the finishing touches, ensuring you’re equipped with the knowledge to tackle a variety of repair challenges. With patience, the right tools, and a bit of know-how, you can breathe new life into your cherished diecast cars, preserving their value and beauty for years to come.
Assessing the Damage in Your Diecast Model
Before diving into repairs, a thorough assessment is crucial. Begin by carefully examining the model under good lighting. Look for any visible damage, such as paint chips, scratches, dents, or broken parts. Use a magnifying glass to spot finer details and assess the extent of the damage. Check for missing components like mirrors, wheels, or other small parts that may have fallen off. Evaluate the overall condition of the model; are there any signs of rust or corrosion, especially on metal parts? Take notes and photos of the damage to serve as a reference during the repair process. This assessment will help you determine the scope of the repair, identify the tools and materials needed, and set realistic expectations for the restoration. Proper assessment ensures you can approach the restoration with a clear plan of action.
Identifying Common Diecast Issues

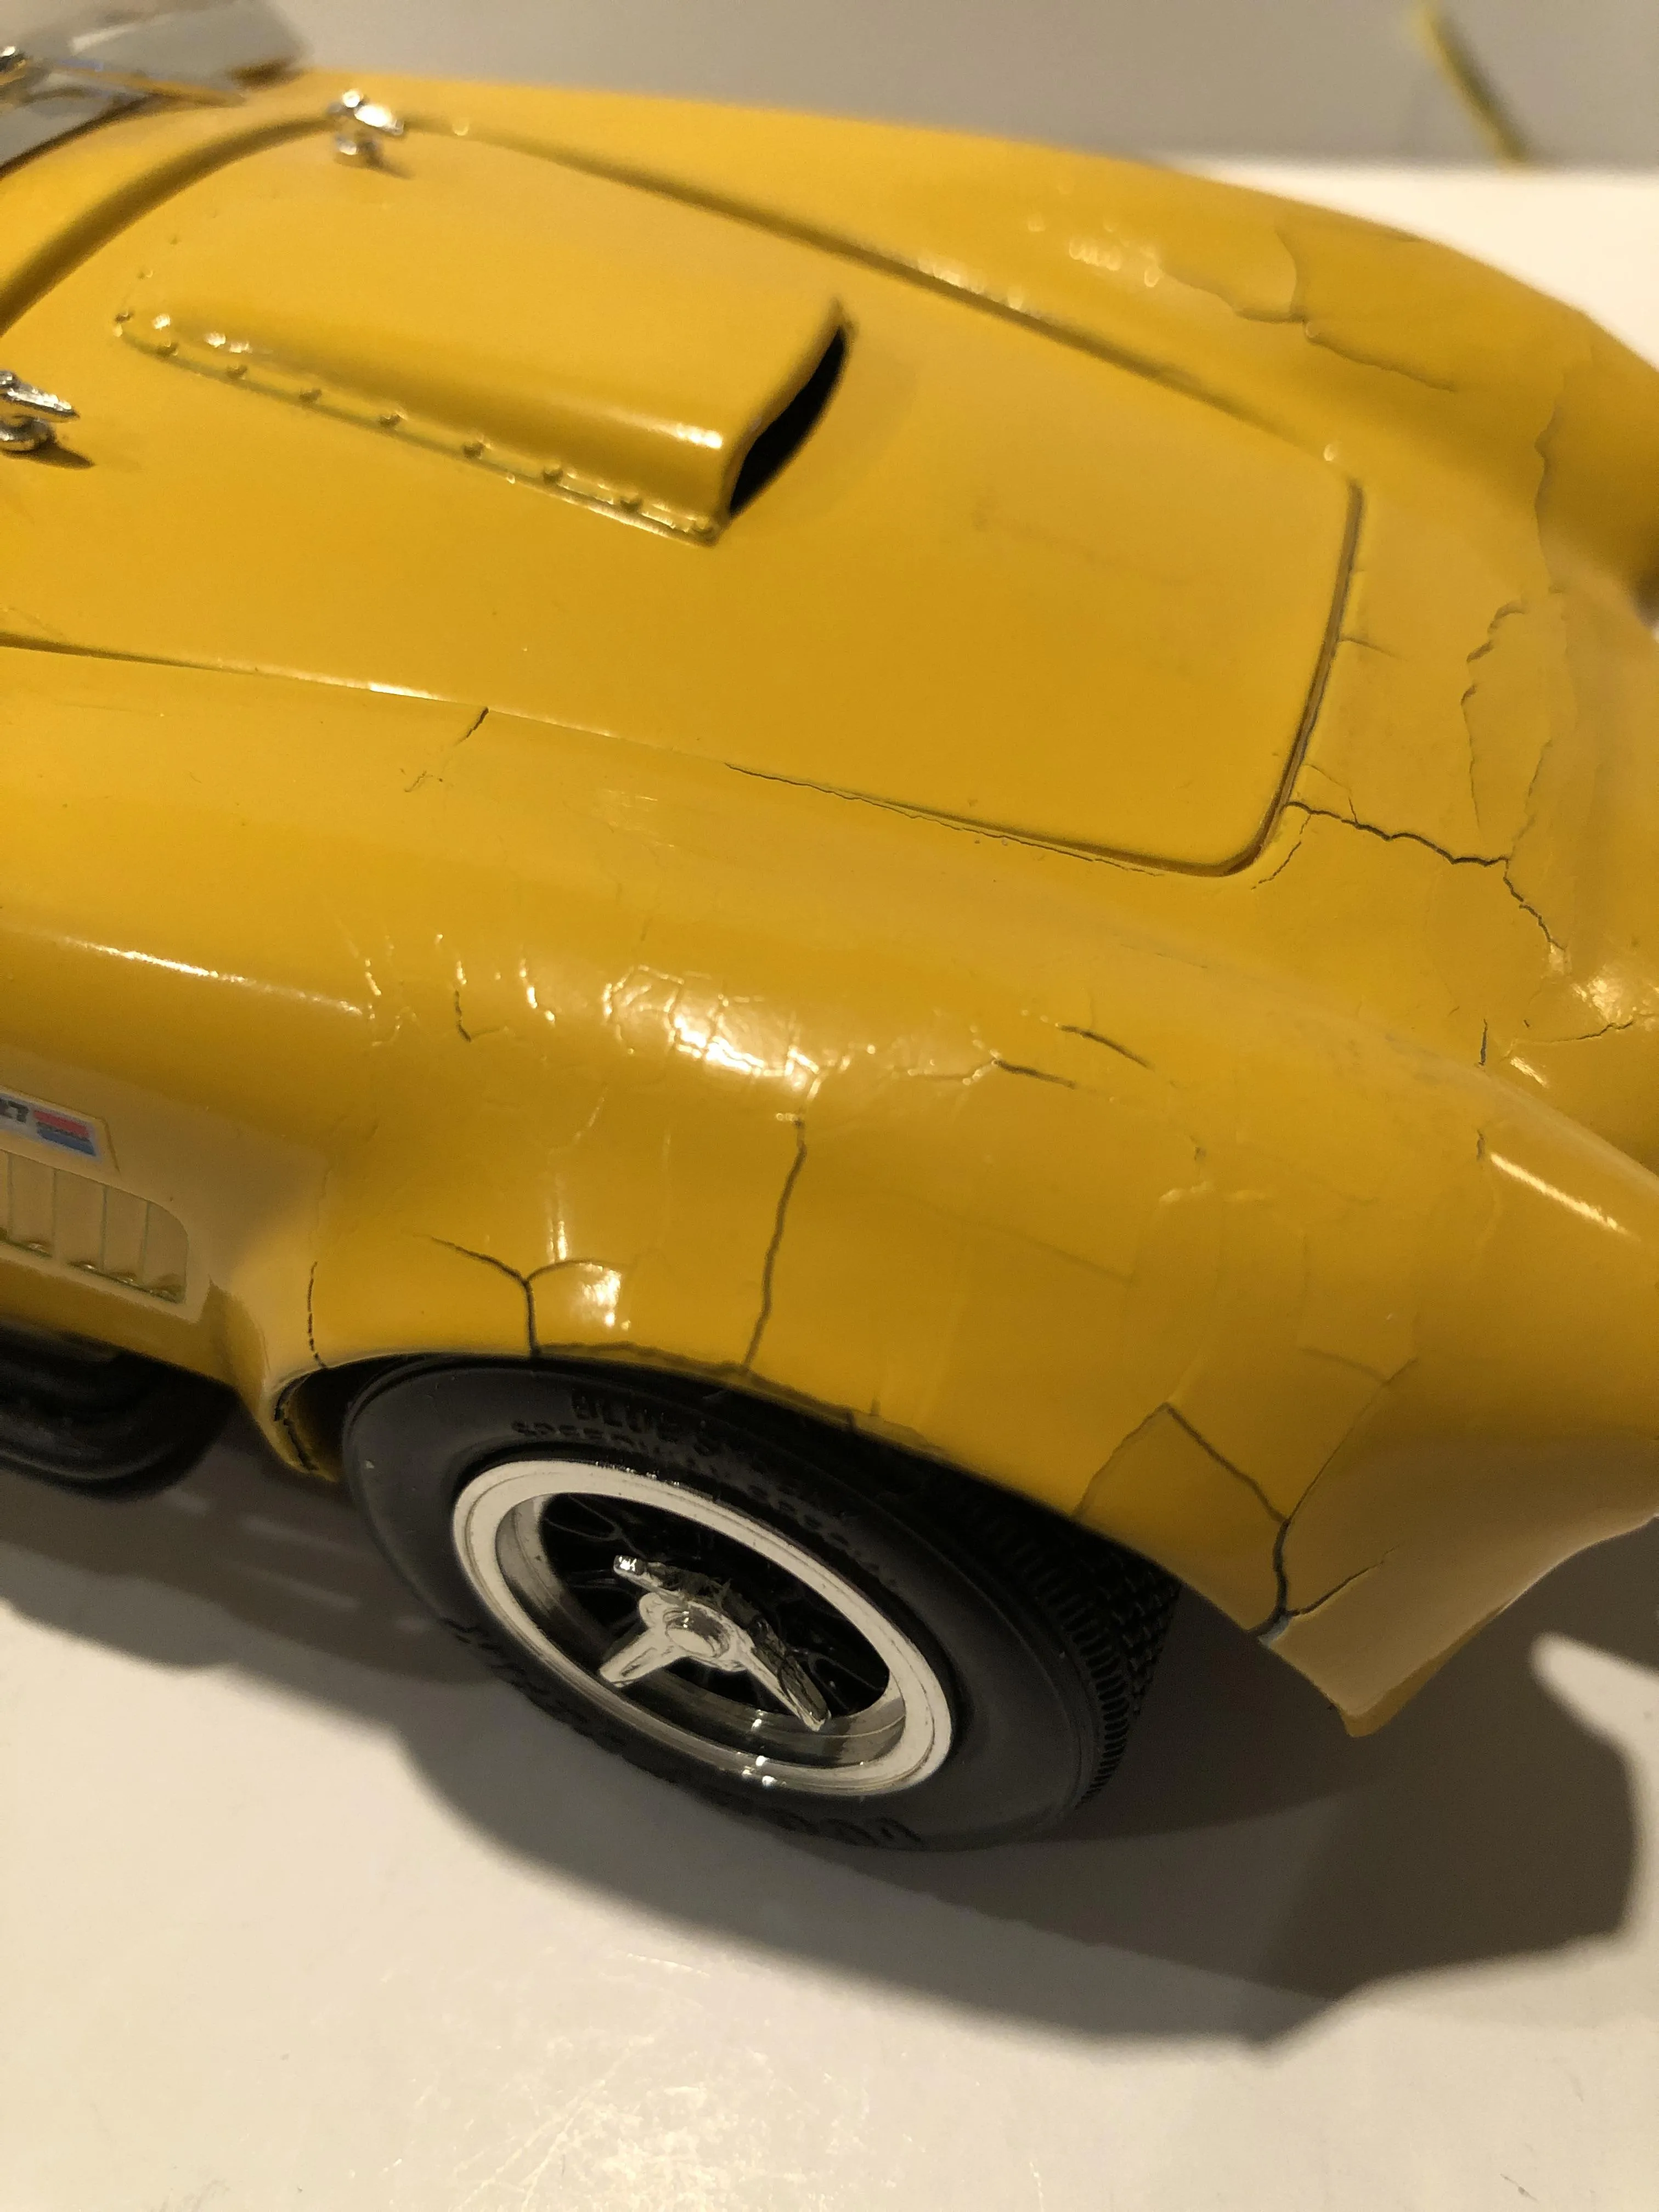
Diecast models are susceptible to a range of issues that can detract from their appearance and value. Paint damage is one of the most frequent problems, including chips, scratches, and fading. These can be caused by impacts, improper handling, or exposure to sunlight. Another common issue is the loss of small parts, such as mirrors, wipers, or badges, which can be easily knocked off or become detached over time. Wheels and axles are also prone to damage, often bending or breaking due to wear and tear or mishandling. Rust and corrosion can affect metal components, particularly if the model has been stored in a humid environment. Lastly, decal degradation is another concern, with decals peeling, cracking, or fading. Understanding these common issues helps you proactively identify and address them, thus preserving the model’s condition and enhancing its longevity.
Paint Damage and How to Fix It
Paint damage is a common problem, and there are several methods to address it. For minor chips and scratches, you can use a fine-tipped brush or toothpick to carefully apply matching enamel or acrylic paint. Ensure the area is clean before applying the paint, and allow each layer to dry completely. For larger areas, consider using a small airbrush or spray can for more even coverage. Prior to painting, you may need to gently sand the damaged area to create a smooth surface. After the paint has dried, you might want to apply a clear coat to protect the finish and blend it with the original paint. When selecting paint, try to find a color match for the original, or consider mixing paints to achieve the perfect shade. Paint repair can significantly improve the appearance of the model.
Chips and Scratches Repair
Repairing chips and scratches requires precision. Begin by cleaning the area with isopropyl alcohol to remove any dirt or oil. For chips, carefully fill them with a suitable filler, such as automotive spot putty, and let it dry. Once dry, sand the area smooth using fine-grit sandpaper. For scratches, lightly sand the area to smooth out the edges. Next, apply matching paint using a fine brush or a toothpick, building up thin layers until the chip or scratch is filled. After the paint dries, you can lightly sand the area again to level it if needed. Finally, apply a clear coat to protect the finish and blend the repair seamlessly with the original paint. It’s important to use the right tools and be patient for the best results.
Using the Right Tools for Paint Repair

The right tools make all the difference in paint repair. Essential items include fine-tipped brushes, toothpicks, and a magnifying glass for precision. You’ll also need fine-grit sandpaper (1000-2000 grit) for smoothing surfaces and blending the paint. A hobby knife can be used for scraping off excess paint or removing debris. Automotive spot putty is excellent for filling chips and imperfections. An airbrush or spray can provide more even paint coverage, while a clear coat helps protect and blend the finish. Ensure you have a well-ventilated workspace, and use appropriate safety gear, like a respirator mask, to avoid inhaling paint fumes. Investing in quality tools will improve your results and make the repair process more enjoyable.
Applying Primer and Paint
Before applying paint, primer is essential, especially on metal surfaces. Primer creates a base for the paint to adhere to and helps prevent corrosion. Apply a thin, even coat of primer using an airbrush or spray can. Allow it to dry completely before sanding lightly with fine-grit sandpaper. Next, apply the paint in thin, multiple coats. This helps to avoid runs and drips. Use a color-matched paint if possible, or mix paints to create the perfect shade. Between each coat of paint, allow the model to dry completely. This can take anywhere from 30 minutes to a few hours depending on the paint type and environmental conditions. Once the final coat of paint is dry, you can apply a clear coat for added protection and a polished finish. Patience and precision are the keys to successful paint application.
Missing Parts and Components
Missing parts can significantly affect a diecast model’s appearance, but they can often be replaced or recreated. The first step is to identify the missing components and determine if replacement parts are available. Check online hobby shops, specialized retailers, or auction sites for original or compatible parts. If you cannot find a replacement, consider creating one using materials like plastic, metal, or resin. Use reference photos of the model to ensure accuracy. For small parts, such as mirrors or wipers, you can often fabricate them from scratch using the right tools and materials. Attaching components involves careful handling and precision. Use strong, fast-drying adhesive, such as super glue or epoxy, to secure the new parts. Always ensure the model is clean before applying the adhesive to ensure a strong bond.
Finding Replacement Parts

Finding replacement parts can be challenging, but several resources can help. Online marketplaces such as eBay are great places to source parts for diecast models. Hobby shops and specialty retailers often carry a wide selection of parts. Join model car clubs or online forums to connect with other enthusiasts. They can provide guidance and might have spare parts available. Search for the specific model and year of your diecast to find compatible components. When searching online, use detailed keywords to narrow your search. Additionally, consider aftermarket parts manufacturers, which create components for a variety of model types. Always compare prices and read reviews before purchasing. Careful research and networking can increase your chances of finding the right parts.
Replacing and Gluing Components
Replacing and gluing components requires precision. Prepare the surface by cleaning the area where the new part will be attached. Use a strong adhesive, such as super glue or epoxy, for a secure bond. Apply a small amount of glue to both surfaces and carefully position the new part. Hold the part in place until the glue sets, referring to reference photos to ensure correct alignment. Use masking tape to hold larger pieces in place while the glue dries. For complex assemblies, consider using a jig or fixture to ensure proper alignment. Be careful not to get glue on unwanted areas, and clean up any excess immediately. Once the glue has fully cured, double-check that the component is firmly in place. This attention to detail ensures a professional-looking repair.
Dealing with Broken Wheels and Axles
Broken wheels and axles can significantly impair a diecast model’s functionality and appearance. First, you must carefully remove the damaged wheels or axles. This often involves gently prying them off, or disassembling parts of the model. Inspect the remaining components to assess what damage has occurred. Replacement wheels and axles can often be found at hobby shops, online retailers, or by using parts from similar models. Before replacing wheels, it’s essential to clean the area and ensure that the new parts fit correctly. For axles, ensure the replacements are the correct length and diameter to fit the model’s chassis. Replacing broken wheels and axles can restore the model’s rolling functionality. Applying a drop of lubricant to the axles can help prevent friction and ensure smooth wheel rotation.
Wheel and Axle Repair Strategies

Repairing wheels and axles often involves replacement, but some strategies can extend their life. If the axle is bent, you might carefully straighten it using pliers or a vise, but this can weaken the metal, so it’s best to replace it. You might use a small drill bit to enlarge the axle holes, especially if the wheels are tight. When installing new wheels, make sure they are securely attached to the axles. Using small amounts of super glue is usually enough to bond the wheel and axle together. If the wheels are loose, you can add small washers or shims to secure them. Also, keep an eye out for wheels with cracked rims, as this may require replacement. For specialized wheels, consider seeking professional repair or replacement services for the best results.
Metal Restoration for Diecast Models
Metal parts can rust or corrode. To restore metal parts, start by removing the rust. There are several methods, from gentle to aggressive, which you should adjust according to the level of corrosion. For mild rust, gently cleaning with a soft brush and a rust-removing solution may suffice. For heavier rust, consider using a fine steel wool or a wire brush. Be careful not to scratch the metal. Another option is using electrolytic rust removal, which can remove rust without damaging the underlying metal. After removing the rust, clean the metal thoroughly to remove any residue. Apply a metal polish to restore the shine and protect the surface from future corrosion. Alternatively, you may use a clear coat to protect the metal finish. Careful metal restoration can bring a vintage model back to life, enhancing its value and appearance.
Cleaning and Polishing Metal Parts
Cleaning and polishing are essential steps in metal restoration. Before starting, disassemble the model or remove any parts that could be damaged during the process. For light cleaning, use a mild soap and water solution. For heavier cleaning, use a metal cleaner or a degreaser to remove dirt, grime, and old polish. Once the metal is clean, it’s time to polish. Apply metal polish to a soft cloth and gently rub it onto the metal parts. Work in small circular motions, and apply more polish as needed. Avoid applying too much pressure, which could damage the metal. After polishing, wipe off any excess polish and buff the metal with a clean cloth to bring out the shine. Regular cleaning and polishing can keep your diecast models looking their best.
Rust Removal Techniques

Rust removal is a crucial part of metal restoration. For mild rust, start with a soft brush and a rust-removing solution. Apply the solution and gently scrub the affected area. For heavier rust, you can use a variety of methods. Steel wool or a wire brush can remove rust, but be gentle to avoid scratching the metal. Electrolytic rust removal is another effective method. It involves using an electrolytic bath to remove rust without damaging the metal. This method requires a power supply, a container, and a cleaning solution. After removing the rust, it’s important to neutralize the metal by cleaning the parts thoroughly with water. Once the rust is removed, apply a metal protectant to prevent future corrosion.
Reassembling Your Repaired Diecast Car
Reassembling your diecast model is the final step of the repair process. Before reassembling, make sure all parts are clean and dry. Arrange all components in order of reassembly. Refer to reference photos or the original model to ensure correct placement. Start by attaching the larger parts first, such as the chassis and body. Use appropriate adhesives, such as super glue or epoxy, to secure parts where necessary. Carefully align all components and ensure they fit properly. Pay close attention to small details, like mirrors, wipers, and badges. Once all parts are in place, allow the glue to dry completely before handling the model. After reassembly, double-check your work and make sure all parts are securely attached.
Checking and Finalizing the Restoration
Once the model is reassembled, it’s time to check and finalize the restoration. Inspect the model under good lighting to identify any remaining imperfections. Check the paint for any runs, drips, or blemishes. Correct any issues using fine-grit sandpaper or paint touch-ups. Ensure that all parts are securely attached and that the wheels roll freely. Consider applying a clear coat to protect the paint and give the model a polished look. Once you are satisfied with the restoration, take photos of the restored model to document your work. These photos can also be used to compare before-and-after results. Finalizing the restoration requires attention to detail and ensures that your model looks its best.
Tips for Maintaining Your Restored Models

Maintaining your restored diecast models is crucial for preserving their value and appearance. Store your models in a clean, dry environment away from direct sunlight and extreme temperatures. Use display cases or protective boxes to protect them from dust and damage. Handle your models with clean hands to avoid transferring oils or dirt. Dust your models regularly using a soft brush or cloth to prevent dust buildup. Avoid using harsh chemicals or abrasive cleaners, as they can damage the paint or decals. When displaying your models, arrange them so they are not exposed to direct sunlight, which can fade the paint. By following these tips, you can ensure your restored diecast models stay in excellent condition for years to come.