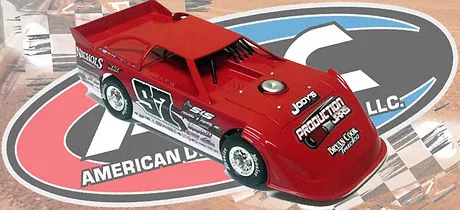
What is Custom Dirt Diecast?
Custom dirt diecast cars represent a fantastic intersection of the model car hobby and the rugged appeal of off-road racing. It’s the art of taking a standard diecast model—typically a miniature replica of a car—and modifying it to reflect a unique design, often with a focus on a dirt track or off-road aesthetic. This can involve anything from changing the paint scheme and adding custom decals to modifying the suspension, wheels, and tires to give it a more realistic, aggressive look. For enthusiasts, the appeal lies in the creativity, the meticulous attention to detail, and the satisfaction of crafting a one-of-a-kind miniature vehicle. Unlike simply collecting factory-made models, building a custom dirt diecast allows for a personalized touch, enabling you to create a replica of a real race car, a fictional design, or anything in between. This process is not just a hobby; it’s a form of artistic expression, a way to bring your automotive visions to life in miniature form. The best part is that you don’t need expensive tools or years of experience to get started; with patience, creativity, and a little bit of research, anyone can begin creating custom dirt diecast models.
Materials Needed for Your Custom Build
Embarking on the journey of creating custom dirt diecast cars requires a selection of essential materials and tools that will enable you to transform a standard model into a personalized masterpiece. First and foremost, you’ll need a diecast car to serve as your base—choose a model that resonates with your vision, whether it’s a classic muscle car or a modern off-road racer. Besides the base car, the other materials are equally important. You’ll need a variety of paints, including primers, base coats, and clear coats, as well as paint thinners to achieve the desired consistency and finish. Decals and custom graphics are essential for adding personalized details, and you might want to invest in aftermarket parts like new wheels, tires, and suspension components to enhance the realism and aesthetic of your dirt diecast. Sandpaper in various grits, from coarse to fine, is needed for smoothing surfaces and preparing them for paint. In addition to paint, you’ll need a variety of glues to secure the parts, clear coat and gloss varnish, as well as a selection of detail brushes to create intricate designs.
Choosing the Right Diecast Base

The foundation of your custom dirt diecast project begins with selecting the right base model. The choice of diecast base significantly influences the final outcome, so it’s crucial to select a model that aligns with your vision and desired modifications. Consider the scale, with common options being 1:64, 1:43, and 1:24—smaller scales are easier to work with, but larger scales offer more detail. Examine the car’s body style, paying attention to its shape, features, and overall design, to ensure it fits the aesthetic you want to achieve. The availability of aftermarket parts is another critical factor. Research whether there are custom wheels, tires, or suspension components available for the model you’re considering. Consider the model’s condition; a newer diecast might require less preparation work, while a vintage model could present unique challenges and opportunities. Some enthusiasts look for models with existing off-road characteristics, such as higher ground clearance or aggressive styling, to simplify the customization process. The best base model will depend on your specific goals. Selecting a model that resonates with your vision and aligns with your skill level will set the stage for a successful and enjoyable custom dirt diecast project.
Preparing the Diecast for Customization
Before applying the first coat of paint, meticulous preparation is essential for achieving a professional-looking custom dirt diecast. Begin by disassembling the diecast as much as possible, removing the wheels, interior, and any other components that could hinder the painting process. This allows for easier access to all surfaces and prevents unwanted paint on parts that should remain untouched. Clean the model thoroughly with warm, soapy water to remove any dirt, grease, or oils that may be present. Next, address any imperfections on the surface, such as scratches, seams, or molding lines, by sanding them down with fine-grit sandpaper. For areas that need filling, such as gaps or holes, apply a thin layer of model putty, allow it to dry, and then sand it smooth. This preparation ensures a smooth surface for paint adhesion. Masking is also critical. Use masking tape to protect areas you don’t want to paint, such as windows, trim, and the interior. Take your time with the preparation process; the quality of your final finish directly correlates with the effort you put into the prep work. This is the key to a flawless finish.
Disassembly and Cleaning
Disassembly and cleaning are critical stages in preparing your diecast model for customization. Begin by carefully removing all the parts that can be detached. Wheels and tires should come off first. Next, you’ll need to remove the interior, windows, and any other components that are not part of the main body. Use appropriate tools such as small screwdrivers, hobby knives, or specialized diecast disassembly tools to avoid damaging the parts. Take photos of the car before disassembly to use as a reference when reassembling. Once disassembled, clean all the parts, including the body, interior, and any other components, with warm soapy water. This removes any residue from the manufacturing process, such as release agents or oils that could interfere with paint adhesion. After washing, allow all parts to dry completely. Inspect each component for any imperfections, such as mold lines, flash, or other defects, and carefully remove them with fine-grit sandpaper or a hobby knife. This process sets the stage for a smooth, professional finish. Proper disassembly and cleaning are essential steps in preparing your custom dirt diecast, directly impacting the final appearance and quality of your model.
Paint and Finishing Techniques

Painting is where your custom dirt diecast truly takes shape, and the techniques you employ will significantly impact the final look of your miniature vehicle. Start by applying a primer to the prepared surface of the diecast. Primer provides a base for the paint, improves adhesion, and helps to reveal any remaining imperfections. Apply thin, even coats of primer, allowing each coat to dry completely before applying the next. Once the primer is dry, sand it lightly with fine-grit sandpaper to ensure a smooth surface. The next step is applying the base coat. Use high-quality hobby paints specifically designed for model cars. Apply the base coat in thin, even layers, building up the color gradually. Avoid applying too much paint at once, as this can lead to runs or drips. Between coats, allow the paint to dry completely, and lightly sand any imperfections. Once the base coat is dry, you can add custom details such as decals, stripes, or logos. After the decals have been applied, protect them with a clear coat. Clear coats not only add shine but also protect the paint and decals from damage. Use a high-quality clear coat and apply it in thin, even layers. After the clear coat is completely dry, you can use a polishing compound to achieve a showroom finish. Practice these techniques on a test piece before applying them to your custom dirt diecast.
Choosing the Right Paint
Selecting the right paint is crucial for the appearance and durability of your custom dirt diecast. The market offers a variety of paint types, each with its unique characteristics. Acrylic paints are a popular choice for model cars due to their low odor, ease of cleanup with water, and quick drying times. They are available in a wide range of colors and finishes, making them suitable for various customization projects. Enamel paints are another option, known for their durability and resistance to chemicals. However, they tend to take longer to dry and require specific thinners for cleanup. Lacquer paints offer a high-gloss finish and quick drying times, but they can be more challenging to work with, as they require proper ventilation and can be sensitive to certain solvents. When choosing paint, consider the following factors: color, finish (matte, satin, or gloss), durability, and ease of use. The color should match your vision for the model, and the finish should complement the overall aesthetic. Durability ensures that the paint can withstand handling and exposure to the elements. Easy-to-use paints are ideal for beginners. Experiment with different paint types to find the ones that best suit your skills and project requirements. Consider the application method. You can use airbrushes for a smooth, even finish or brushes for detailed work, but both of them require different paint characteristics.
Painting the Diecast
Painting your custom dirt diecast is a delicate process that requires patience and attention to detail. Before you begin, ensure your workspace is well-ventilated, and you have all your materials and tools within reach. Start by applying a primer to the diecast’s surface. Primer provides a uniform base for the paint and helps to highlight any imperfections that need attention. Apply thin, even coats of primer, allowing each coat to dry completely before applying the next. Once the primer is dry, lightly sand it with fine-grit sandpaper to ensure a smooth surface. Next, apply your base coat, either with an airbrush or a brush, depending on the level of detail required. When using an airbrush, maintain a consistent distance from the model and apply the paint in even strokes. If using a brush, use multiple thin coats to avoid brush marks. Allow each coat to dry before applying the next. Once the base coat is dry, you can add details such as stripes, logos, or other custom graphics. Decals are applied to the surface, and once dry, seal them with a clear coat to protect them. For a realistic dirt effect, use weathering techniques. Apply washes or dry brushing to create shadows, highlights, and texture. Remember to work in a dust-free environment to prevent imperfections. Careful painting is essential to create a visually appealing custom dirt diecast.
Adding Custom Details and Decals
Adding custom details and decals is where your custom dirt diecast truly comes to life, transforming it from a simple model into a personalized work of art. Decals are a key component of this process, allowing you to add logos, graphics, and other intricate designs to your miniature vehicle. Before applying decals, ensure the surface is clean and smooth. Cut out the decals carefully, trimming as close to the design as possible. Submerge the decal in water for a few seconds until it releases from the backing paper. Position the decal on the model using a soft brush or cotton swab, gently smoothing out any air bubbles. After the decals have dried completely, apply a clear coat to seal them and protect them from damage. In addition to decals, consider adding other custom details to enhance realism. This can include custom-made parts such as roll cages, exhaust pipes, or light bars, which can be crafted from various materials like plastic, metal, or resin. Weathering techniques can be used to create a sense of realism. You can use washes, dry brushing, or other techniques to simulate dirt, rust, or wear and tear. The addition of custom details and decals is a great way to showcase your creativity and make your custom dirt diecast truly unique.
Reassembly and Finishing Touches
Reassembly and finishing touches mark the culmination of your custom dirt diecast project, the moment when all your efforts come together. Start by carefully reassembling all the components you disassembled earlier. This includes the interior, windows, wheels, and any other parts that were removed during the preparation and painting stages. Refer to your reference photos or the original instructions to ensure everything is placed correctly. Secure the parts using appropriate adhesives. Once the diecast is reassembled, inspect it closely for any imperfections or areas that need additional attention. Touch up any paint defects. Apply a clear coat to the entire model. Clear coat adds shine and protects the paint and decals. Use a polishing compound to achieve a showroom finish. After the clear coat has dried, use a polishing compound and a soft cloth to buff the model, bringing out its shine. Clean the wheels and tires to remove any paint or residue, giving them a fresh look. Before you consider the project finished, consider adding weathering effects to enhance the model’s realism. Weathering can involve applying washes, dry brushing, or other techniques to simulate dirt, dust, or wear and tear, creating a more authentic off-road appearance. Carefully reassembling your custom dirt diecast, paying attention to every detail, will ensure that your finished model is a testament to your skill and creativity.