Planning Your DIY Diecast Car Display Case
Embarking on a DIY diecast car display case project is a rewarding endeavor, allowing you to showcase your collection while adding a personal touch to your space. The initial step involves thorough planning, where you’ll consider the size, style, and materials best suited for your needs. Think about where you’ll place the display case. Is it a wall-mounted unit, or a freestanding one? The dimensions will depend on the number of diecast cars you own and their scale. Consider the available space in your room and visualize how the display case will integrate with your existing decor. This phase also entails setting a budget, which will guide your material choices and the complexity of your design. Researching different display case designs online, from simple shelves to elaborate enclosed cases, will spark inspiration and help you refine your vision. Detailed planning ensures a smooth building process and a final product that perfectly complements your diecast car collection.
Choosing the Right Materials
The selection of materials is crucial for both the aesthetics and the functionality of your diecast car display case. The primary decision revolves around the case’s structure and the shelving material. Wood offers a classic, sturdy option, providing a warm and traditional feel. Pine and oak are popular choices, with varying costs and levels of workability. Acrylic, on the other hand, provides a modern, sleek look and allows for excellent visibility of your models. It’s also lightweight and easy to clean. However, acrylic can be more prone to scratches. Consider the transparency and thickness of the acrylic panels to ensure optimal clarity and durability. For the backing of your display case, materials like plywood or MDF (medium-density fiberboard) can provide stability. The choice of materials also influences the tools you’ll need and the construction techniques you’ll employ. Consider the longevity of the materials and how well they will protect your collection from dust and damage. Your budget and personal preference will also influence your decision.
Wood vs. Acrylic: Which is Best?

The debate between wood and acrylic is a central one when choosing materials. Wood provides a classic look, is relatively easy to work with if you have basic woodworking skills and can be easily painted or stained to match your decor. It can also be very cost-effective depending on the type of wood. However, wood can be heavier than acrylic, which might be a concern if you’re planning a wall-mounted display. Acrylic offers unmatched clarity, allowing for an unobstructed view of your diecast cars. It is also lighter, making it easier to handle and install. However, acrylic scratches more easily than wood. Consider where the display case will be placed. If it’s in a high-traffic area, where it might be bumped, wood might be a better choice. If you desire a modern aesthetic and are careful about handling, acrylic is a great option. Consider also, the type of car. High-end cars may benefit from a more ‘high-end’ display case.
Measuring and Cutting Your Materials
Precision in measuring and cutting is paramount for a successful DIY project. Begin by creating detailed measurements for your display case, including the dimensions of the frame, shelves, and any doors or panels. Use a tape measure, level, and pencil to accurately mark the measurements on your chosen materials. Double-check all measurements before cutting to avoid errors. For wood, a circular saw, table saw, or hand saw can be used for cutting. Ensure the blade is appropriate for the type of wood and that you have safety glasses and gloves on. When working with acrylic, a scoring knife or specialized acrylic saw will produce clean cuts. A straight edge is essential to guide your cuts and ensure straight lines. Take your time during this stage, as the accuracy of your cuts will directly impact the final fit and finish of your display case. Consider the thickness of your materials when calculating your dimensions. Once you’ve cut everything, check to make sure it fits!
Essential Tools for the Job
Having the right tools can make the difference between a frustrating and rewarding DIY experience. The essential tools for building a diecast car display case include a measuring tape, level, pencil, saw (circular, table, or hand), drill, screwdriver, and clamps. For woodworking projects, you’ll also need sandpaper, wood glue, and possibly a router for creating decorative edges. When working with acrylic, a scoring knife, specialized acrylic saw, and possibly a heat gun (for bending) are necessary. Safety glasses and gloves are non-negotiable. Other useful tools include a stud finder (if mounting to a wall), a square for ensuring right angles, and a sander for smoothing rough edges. Consider the complexity of your design when assembling your tools. If your display case incorporates lighting, you’ll need electrical wiring tools, such as wire strippers and connectors. Investing in quality tools will not only make your project easier but will also improve the overall finish of your display case.
Step-by-Step Assembly Guide

With your materials cut and tools assembled, it’s time to begin the assembly process. Follow these steps to ensure that your display case comes together smoothly. First, assemble the case frame by joining the sides, top, and bottom using wood glue and screws or appropriate fasteners. Make sure that the corners are square using a square tool and clamps. Then, install the shelves at your desired intervals, securing them with screws or shelf supports. If you are adding doors, install the hinges onto the case and door. Carefully position the door on the frame and secure the door with screws. Next, add the backing, securing it with nails or screws. Once the case is assembled, sand any rough edges, and prepare the case for finishing. Consider the type of fastener to use, such as screws, nails, or dowels, and the best way to secure the frame and other parts. Finally, install any lighting and test to ensure the electronics work.
Assembling the Case Frame
The frame is the foundation of your display case and requires careful assembly. Begin by applying wood glue to the edges of the frame pieces. Secure the corners using clamps to hold them in place while the glue dries and while you fasten the parts together. Use screws or appropriate fasteners to reinforce the joints, ensuring a strong and stable structure. If you’re using wood, pre-drill pilot holes to prevent the wood from splitting. Use a square to ensure that the corners are perfectly 90 degrees. Allow the glue to dry completely before moving on to the next step. The frame’s accuracy is crucial for the alignment of shelves, doors, and other components. A sturdy frame guarantees the long life of your display case. Double-check all measurements and angles throughout the assembly process to guarantee the structural integrity of your frame. Using a level during the frame assembly will also ensure that your display case stands straight and even.
Installing the Shelves
Shelves define the display space for your diecast cars. Before installing, plan the spacing between shelves based on the height of your cars. Use a level to ensure the shelves are straight. Measure the height of your car collection and mark where each shelf will be mounted. Use shelf supports or pre-drilled holes for shelf pins. For fixed shelves, secure them with screws or shelf supports. If you’re using adjustable shelves, install shelf pins to allow flexibility in the arrangement of your cars. When installing the shelves, make sure they’re securely fastened to the frame to prevent them from sagging or collapsing under the weight of the cars. Check the alignment of the shelves and maintain even spacing. Properly installed shelves are not only functional but also contribute to the visual appeal of the display case, providing an organized and attractive showcase for your collection.
Adding the Display Case Door

The display case door adds the final touch, providing protection from dust and allowing easy access to your collection. Choose a door style that complements your design: hinged, sliding, or frameless. If using a hinged door, attach the hinges to both the door and the frame, making sure they are aligned for smooth opening and closing. For a sliding door, install the tracks or channels at the top and bottom of the frame. For frameless doors, consider using magnetic catches or other closure mechanisms to keep the door securely closed. Consider the material of the door. Acrylic doors provide excellent visibility, while wood doors offer a different aesthetic. Install the door hardware, such as handles or knobs, before mounting the door. Check the door’s operation and make any necessary adjustments to ensure it closes properly. A well-installed door enhances the visual appeal of your case and protects your precious collection.
Finishing Touches and Customization
The finishing touches elevate your display case from a functional storage solution to a stunning showcase for your diecast cars. These details allow you to express your personal style and enhance the overall aesthetics. Add trim, molding, or decorative elements to the frame. Customize the interior with fabric, felt, or mirrored backing. These details can create a more visually appealing backdrop and add depth to your display. For a more dramatic effect, add lighting to highlight the cars. Consider adding a small plaque or engraved plate with your name or collection details. Consider adding a locking mechanism to protect your collection. The custom elements can make your case a personalized reflection of your collecting passion. These final touches turn your DIY project into a unique work of art that will perfectly present your prized cars.
Painting and Staining Techniques
Painting or staining provides a polished look and protects the wood. For wood, start with sanding to ensure a smooth surface. Apply a wood primer before painting for better paint adhesion. Choose a paint color that complements your decor. Consider using semi-gloss or satin paint for durability. When staining, apply a wood stain in the color of your choice, then apply a clear coat of varnish or polyurethane for protection and shine. Allow each coat to dry before applying the next. For acrylic, be careful not to use harsh chemicals. Clean the surface with a soft cloth. Painting adds a personal touch, while staining showcases the wood grain. Painting is a great option if your woodworking skills aren’t fully there.
Adding Lighting to Your Display
Lighting can dramatically enhance the display. LED strip lights are a popular choice, offering energy efficiency and a variety of color options. Consider installing lights along the top, sides, or back of the case to highlight your diecast cars. Before installing, plan the placement of the lights and the wiring. You may need to drill small holes to run the wires. Use low-voltage lights for safety, and make sure the lights don’t generate excessive heat. Consider adding a dimmer switch to adjust the intensity of the light. The lighting will show off the details of your collection. Make sure that all electrical connections are made safely and securely. The right lighting will transform your display case into a captivating showcase.
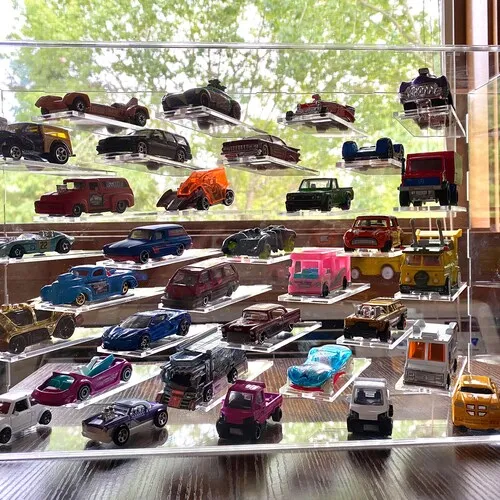
Tips for Displaying Your Collection
Once your display case is complete, the arrangement of your diecast cars is key. Start by organizing your cars in a way that reflects your personal collecting style. This could be based on scale, make, model, or even color. Maintain visual balance within the case. Avoid overcrowding shelves; leave some space around each car. Use risers or stands to add height variations and create more visual interest. Consider rotating your collection periodically to keep things fresh. To enhance the presentation, add small nameplates or descriptions of the cars. Also, ensure that the lighting is appropriately positioned to highlight the details of each car. The presentation of your collection not only adds visual appeal but also tells a story about your passion for diecast cars. Consider what you want the display to do. Do you want it to be a showcase, or to protect the cars? The answer will influence how the collection is displayed.
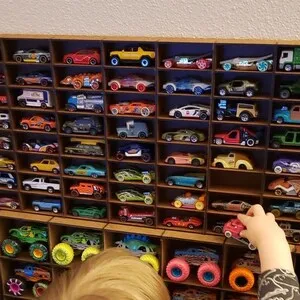
Optimizing Space and Layout
Maximizing the display space and creating an aesthetically pleasing layout is crucial for your diecast car collection. Start by measuring your car collection to determine the optimal shelf spacing. Consider staggering the heights of your cars to create visual interest and prevent overcrowding. If you’re tight on space, consider a multi-tiered display or a rotating display case. Utilize all available vertical space by adjusting the shelf spacing. Use acrylic risers or platforms to elevate certain cars, creating layers within the display. Group cars by theme or scale to enhance visual coherence. Avoid placing too many cars on each shelf. Leave some empty space to avoid a cluttered appearance. Consider using a combination of vertical and horizontal arrangements to add depth to your display. Planning will help you make the most of the available space. You can create an impressive and organized showcase for your collection.
Maintaining and Protecting Your Display Case
Protecting your collection ensures its longevity and preserves its value. Dust your display case regularly with a soft cloth or a vacuum cleaner with a brush attachment. Avoid using harsh chemicals. Check your case for any signs of damage and repair them promptly. Keep the display case away from direct sunlight and extreme temperatures to prevent fading and damage. If your display case has a door, make sure that the door is securely closed to keep dust out. Consider adding UV-protective film to the glass or acrylic to minimize the impact of UV rays on your collection. If you live in a humid area, consider using a dehumidifier to prevent moisture buildup and mold. Regularly inspect your display case for any signs of wear and tear and take appropriate measures to keep your collection safe.